Showing posts with label Blogger Tricks. Show all posts

Sunday, June 27, 2010

How to Add Facebook Badge to Blogger/Website?

Like to Share your Facebook information on other websites or blogs. If so, here is a tip to add your facebook profile badge on your blog like blogger, wordpress, Typepad and others blogging platforms as well.

How to add Facebook profile badge on my blog/website?
How to create Facebook profile badge?
How to include Facebook profile on website?

Answer: "To create a badge, just click on the "Create a Profile Badge" link at the bottom of your facebook profile page which will take you to your Facebook Badge page. On this page, select the "Create Badge" option. You will be walked through the creation process".

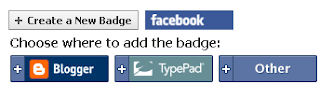
So now to add the facebook profile badge on your blog or website you need to follow the steps given.

It will then provide you with a script which you've to copy and add to your blogger/website [gadget on the layout settings page].

That's all! You've created your own facebook profile badge on your blog. Comment for any queries.

Also You can show the Widget/Gadget only on certain pages of your blogger.

Wednesday, June 23, 2010

How to Add Google Buzz This Button for Blogger

Google Buzz is an innovative social media platform that allow users to share personalized updates, blog posts, images, videos and more with their friends (those who follow them). This is similar to Twitter and Facebook which helps to drive additional traffic to your site. You can find this Buzz directly in your mailbox. You'll get additional exposure for your posts If you add Google "Buzz this" button to your blogspot posts.

The process of adding Buzz button to blogspot is very simple and completes in just few minutes. Follow the below instructions.

* Login to your Blogger Dashboard using your Google account.
* Click on “Layout” (changed to "Design" recently) >> “Edit HTML”
* Search (Cntrl + F) for following code inside your template (Press “CTRL + F”)

<div class='post-header-line-1'>

* Now add the following code just below the above line

for Large Button (add this code)

<a href='javascript:var%20b=document.body;var%20GR________bookmarklet_domain=&quot;http://www.google.com&quot;;if(b&amp;&amp;!document.xmlVersion){void(z=document.createElement(&quot;script&quot;));void(z.src=&quot;http://www.google.com/reader/ui/link-bookmarklet.js&quot;);void(b.appendChild(z));}else{}'><img alt='Buzz this' src='http://img2.pict.com/15/da/3e/2809374/0/googlebuzz.png'/></a>

for Small Google Buzz button (add this code)

<a href='javascript:var%20b=document.body;var%20GR________bookmarklet_domain=&quot;http://www.google.com&quot;;if(b&amp;&amp;!document.xmlVersion){void(z=document.createElement(&quot;script&quot;));void(z.src=&quot;http://www.google.com/reader/ui/link-bookmarklet.js&quot;);void(b.appendChild(z));}else{}'><img alt='Buzz this' src='http://img2.pict.com/9c/09/57/2854010/0/buzzthis.gif'/></a>

* Save the template and you are done.

Now Google Buzz this button will appear in all your blog posts. Go on and Buzz Now!

Also Read How to Improve Page Rank

Thursday, May 7, 2009

How To Remove Label Number Count Hack

There is a Feature in Blogger that whenever we display labels widget in our Blog,it also displays number of posts in that label.Some feel this annoying.So,There is a hack to remove label count from blogger or site.It simply displays labels without number of posts.

Step1 :- Backup Your Template First.
Step2 :- Goto->Laout->Edit Html->Click on Expand Widget templates
Step3 :- Search following code

<b:widget id='Label1' locked='false' title='Labels' type='Label'>

Step4 :- Near to this code find

<data:label.count/>

and delete it.

Step5 :- Save your template.Done.You successfully implemented the hack.

Note :- You should add your label widget to blogger.If not,you cannot implement the above process.

Thanks.Do Subscribe to us email newsletter if you like the post.

Disable Right Click For Blog or Site

There is a question for bloggers always that their content should not be copied by others.So,Let's See How to disable Right Click option in blogger or website!

This Code is For disabling copy option in blog site:

Goto Dashboard->Layout->Add Gadget->Add HtmlScript

and paste the following code in there.

<script language="JavaScript">
<!--

//Disable right mouse click Script

var message="Function Disabled!";

///////////////////////////////////
function clickIE4(){
if (event.button==2){
alert(message);
return false;
}
}

function clickNS4(e){
if (document.layers||document.getElementById&&!document.all){
if (e.which==2||e.which==3){
alert(message);
return false;
}
}
}

if (document.layers){
document.captureEvents(Event.MOUSEDOWN);
document.onmousedown=clickNS4;
}
else if (document.all&&!document.getElementById){
document.onmousedown=clickIE4;
}

document.oncontextmenu=new Function("alert(message);return false")

// -->
</script>

Save the Script and place the widget anywhere you like.It will work for whole blog.Now,when you try to copy content using "Right Click",It wont work.

Do Comment,If Yoy Like the post.

Monday, March 23, 2009

Change Blog's Background Page Color

Changing Color of Background for blogger is very easy.

Go to LAYOUT,click Edit HTML

Search for #outer-wrapper {

Now

Add the following line to it as shown below

background: choosen color;

Example : background: green;


/* Outer-Wrapper
------------------------------------------------ */
#outer-wrapper {
width: 750px;
margin:0 auto;
padding:10px;
text-align:left;
font: $bodyfont;
background: green;
}


You can choose whatever color you want in the place of green.
Preview the template and if u like it,then save the template.

That's it.Hope u liked our tip,then subscribe to us for more updates.

Saturday, March 21, 2009

Add Text Box or Text Area in Blogger

So many wonder how to put text box using java script.Its so simple.It is also useful for bloggers who show html script for copying.

How?2 ways of text boxes.

Go to Template->Page Elements->Add a Page Element and select "HTML/JavaScript"

1]Users can input text - Copy Below code

<textarea rows="5" cols="40">
YOUR TEXT HERE
</textarea>

For Example,See below text area,You can edit whatever you want.


2]Read only Textbox - Copy Below code

If the text box contains terms and conditions or information, we can insert a attribute into the textarea code. Readers can view the text but they cannot edit or amend it, or insert any input into the box.

<textarea rows="2" cols="30" name="Famous Quotes" readonly="readonly">
Your Text Here
</textarea>

For Example: See below.You cannot edit.Its not changable.


You can also add links in the text box,simply add your link code instead of "YOUR TEXT HERE"
Also Change rows and columns as you require.

Thanks 4 Visiting.Do Subscribe If u like our posts.

Friday, March 20, 2009

Open Links in New Window or New Tab

NOrmally,all our links open in the same window or tab.This will be annoying to some users.B'coz,some dont like visitors to leave their site always.So,if we use links to open in new window,our problem will be solved.

To do it

For Text Links

<a href="http://www.blogger.com/" target="_blank">Blogger</a>

For Image Links

<a href="URL" target="_blank" title="TITLE"><img src="Image URL" border="0" width="80" height="15" alt="Description"></a>

We used targe="blank" to open the link in new page.
We can also use target="new" instead of target="_blank".Both are same.

"Subscribe to our email notifications 4 more updates."

Remove Header Image-See How?

Well,most of the templates that come with our blogger has a diability to remove header b'coz it is locked by the blogger.So,to remove it,we need to do some coding.Don't worry,its a very simple coding.

Goto Template/Layout->Edit Html->Expand Widget Template

Find the following Code

<div id='header-wrapper'>
<b:section class='header' id='header' maxwidgets='1' showaddelement='no'>
<b:widget id='Header1' locked='true' title='(Header)' type='Header'/>
</b:section>
</div>

Now Change the above code as shown below

<div id='header-wrapper'>
<b:section class='header' id='header' maxwidgets='3' showaddelement='yes'>
<b:widget id='Header1' locked='false' title='(Header)' type='Header'/>
</b:section>
</div>

Thats it.Now You can easily remove the header.

Do Comment if problem exists.

Saturday, March 14, 2009

Remove Subscribe To Post Atoms Link

Blogger has a feature to Subscribe To Post Atoms which appears under the post body.
blogger-atom-feed-link
If You need to remove this link.Then Follow the below instructions.

1.Goto Layout->Edit Html->Expand Widget Templates
2.Find the following Code [Cntrl+F]

<b:include name='feedLinks'/>

Now Delete this code and preview the template before saving to check if any errors occured or not.

Now Save settings.
For any Queries,please leave a comment.

Add Comment Form Under Post

Commenting is a very helpful feature mainly for bloggers to know what visitors think about our site.Till now we had no choice to include comment form in blogger without adding any external code.Blogger Introduces Inline Comments Now.So,we can easily integrate comment form under every post with no extra effort.

How?

Goto Draft Blogger and login with your Userid.

Click on Settings->Comments
embeddcomment
In that goto "Comment Form Placement" and Check "Embedded below post" Option.
Now Save Settings.That's It.You have successfully embedded Comment form in your blog.

Tuesday, March 10, 2009

Insert-Embedd Search Box in Header

You Embedd Your Google/Custom Search Box in Header using following steps.The look of the page will be very neat.

How To ?

1.Login to Blogger with your ID
2.Click Layout->Edit Html
3.Click on Expand Widget Template
4.Search for the following code

<div class='descriptionwrapper'>
<p class='description'><span><data:description/></span></p>

5.Now Add your search box code after these lines.
6.Save your template.Finished.

Finally,your blog looks like this.

search-box-under-header

Hope,you liked our blog.Then,subscribe to our free emails.Do comment,if u face any problems.

Monday, March 9, 2009

Display-Show Widget Only on Homepage

Generally Widgets/Gadgets that are created on home page will also seen in all post pages.This is a little bit annoying.So,if we can display widgets only in our required pages,it will be very happy 4 us.

Goto Layout->Edit Html->Click On Expand Widget Template

Search for your required widget code.Just type your widget name that you have given when creating the widget.

In my Case I Used "Get Free Email Alerts 4m Us".

So when u get the code.Add the following code to display widget on home page only.

<b:if cond='data:blog.url == data:blog.homepageUrl'>

The Final Code after after modifying should look like this.Add the 2 codes marked in red to your code.

show-widget-on-home-page-only

Also,if u want to display widgets in all pages except in home page.Then,add below code instead of above one.

<b:if cond='data:blog.pageType == "item"'>

Or You can also display widget in particular page.For that add below code instead of above one.

<b:if cond='data:blog.url == "blog post URL"'>

Liked our post,then subscribe us.

Dont forget to leave comments.

Sunday, March 8, 2009

Embed Youtube Videos in Post Body

Wonder How to Embed Youtube Videos into your blogger post body.Its Pretty simple.

Step-1:Goto Youtube and Search for you videos there like shown below.

embed-youtube-videos-in-blogger

Step-2:When You click on your req.video,You will get a url and a embedd code on the right sidebar like shown below.

youtube-embedd-code

Step-3:Just copy the embed code and paste it in your blog post wherever you want.

Note:If you want to change size,then just edit the width and height to your requirements.

If you have any doubts regarding to this post,feel free to ask it here via your comments.
Subscribe to our Email News Letter if u like our post.

How to Remove Navbar From Blogger

The Navbar is placed on top of our page.Just take a Look at this.

remove-navbar

It allows us to naviagate easily.But,it looks annoying/disturbing to users.So if u want to Remove,Hide,Disable Navbar from Blogger.Then,follow the steps.

1.Login to Blogger
2.Click Layout->Edit Html

blogger-layout

3.Copy and Add Following Code in the Html Like shown in Figure

#navbar {
height: 0px;
visibility: hidden;
display: none;
}

edit-html

4.Save Changes.

This tip only hides the navbar.It doesn't delete the navbar.So,if u want ur navbar back,You can simply delete this code.For any queries,do comment us.

Add Google Sitemap For Blogger Blog

To add Google Sitemap for ur blog.Goto Webmaster Tools.Sign in to your account [or create 1 if u don't have]
In Add this site box,Add ur URL as http://bloggertricky.blogspot.com/.

add-ste-box

You will get a "Your site has been added to your account".Click Verify and you will get 2 options to add meta tag.

Option-1:Add Meta Tag
Option-2:Upload HTML File

Option:-1: You will get a meta tag.

Meta-tag-google

Just copy that meta tag.Sign into Dashboard, select your blog, click TEMPLATE tab and paste the meta tag in between the and tags. Save and republish. Check the "I've added the META tag in the home page of http://your-blog-url.com/" box and click the [verify] button.

There will be a message "We do not know about all the pages of your site. [Submit a Sitemap] to tell us more about your site. Click [Submit a Sitemap] and in the "Choose type..." selection box, select "Add General Web Sitemap".

http://bloggertricky.blogspot.com/atom.xml?redirect=false&start-index=1&max-results=100 (If you have up to 100 posts)

And if you have more than 100 articles or posts, then you have to add more sitemaps, after you have already added the previous one, like these:

atom.xml?redirect=false&start-index=101&max-results=100 (If you have up to 200 posts)

atom.xml?redirect=false&start-index=201&max-results=100 (If you have up to 300 posts)
atom.xml?redirect=false&start-index=301&max-results=100 (If you have up to 400 posts).

Finished.Just Easy.If u got any problem.Just leave a comment.

If u like our post.Please Subscribe us.

Saturday, March 7, 2009

Insert Adsense Ads In Blogger Post

We Often think of placing ads in between posts but we don't know how to do it.I verified a lot of tutorials and trialed it on my blogs.It worked.I will explain how to embedd adsense ads in between posts body.

Step :- 1

Backup ur Template.In case some mishap occurs you can easily restore your original template. To save your blogger template first go to Layout -> Edit HTML -> Click the Download Full Template link and save the template on your PC.

Step :- 2

Generate Parsed code for adsense code b'coz we cannot put adsense code directly in the xml.So parse it using AdParser.


After parsing,your ad code Should look like this.

----------------------------------------------------------
<script type='text/javascript'><!--
google_ad_client = "pub-xxxxxxxxxxxxxxx";
/* 468x60, created 2/4/08 */
google_ad_slot = "xxxxxxxxx";
google_ad_width = 468;
google_ad_height = 60;
//-->
</script>
<script src='http://pagead2...../pagead/show_ads.js'
type='text/javascript'>
</script>
----------------------------------------------------------

Paste this Code Above or Below Post Header Line [Actual Code U have to use]

-----------------------------------------------------------
<p align="center">
Your Ad code
</p>

Note: /* Replace "center" with "left" or "right" for desired alignment */
-----------------------------------------------------------

To place ad above/below your post header, find the following code in your template.Layout->Edit Html->Click Expand Widget Templates

----------------------------------------------------------
<div class='post-header-line-1'/>
----------------------------------------------------------

To place ad above your post header.Paste the code above this line.
To place ad below your post header.Paste the code below this line.

To place the ad at the end of your post body, find the following line in your template.

----------------------------------------------------------
<p><data:post.body/></p>
----------------------------------------------------------

Paste the code below this line, to show your ad right at the end of your post.


To align the ad on left, right or middle


This is actual code u have to paste in the xml body.

Try this Technique.It Works.If u have any problem just comment in the comment form.

If u like our post.Please Subscribe us.